The chart of accounts is the list of structured account numbers which categorize an organization's accounting activities.
The creation of individual accounts is the culminating step in a five- or six-step process which includes creating:
- calendars
- units
- segments
- segment items
- account rules (optional)
The chart of accounts is the backbone of the accounting system. It should be designed to capture financial information to empower sound financial decisions. A chart of accounts is generally grouped into assets, liabilities, capital, revenue, and expenses.
Your organizational chart could serve as the outline for structuring your chart of accounts. For example, suppose your business is divided into ten departments (production, marketing, human resources, etc.). Each department is probably accountable for its own expenses (salaries, supplies, phone, etc.). The chart of accounts will tend to be as large and as complex as the company associated with it.
A few general considerations when using, adapting, or building a chart of accounts from scratch:
- What financial information do you need to track to manage your business?
- What financial reporting do you need and to whom will you be reporting?
- What information do you need to prepare your tax returns?
- Is your business subject to any special regulatory reporting requirements?
Another thing to think about is the level of detail you need in the chart of accounts. A very general chart of accounts, with only very broad categories of accounts, may make bookkeeping easy, but falls short in analysis capability. On the other hand, a very detailed chart of accounts may make bookkeeping cumbersome, but will afford you very granular analysis. In general, you need to seek the level of detail in your chart of accounts that will meet your company's needs.
Create an individual GL account
- In the Navigation pane, highlight the General Ledger > Chart of Accounts folder.
- Click
 . The New Account window opens.
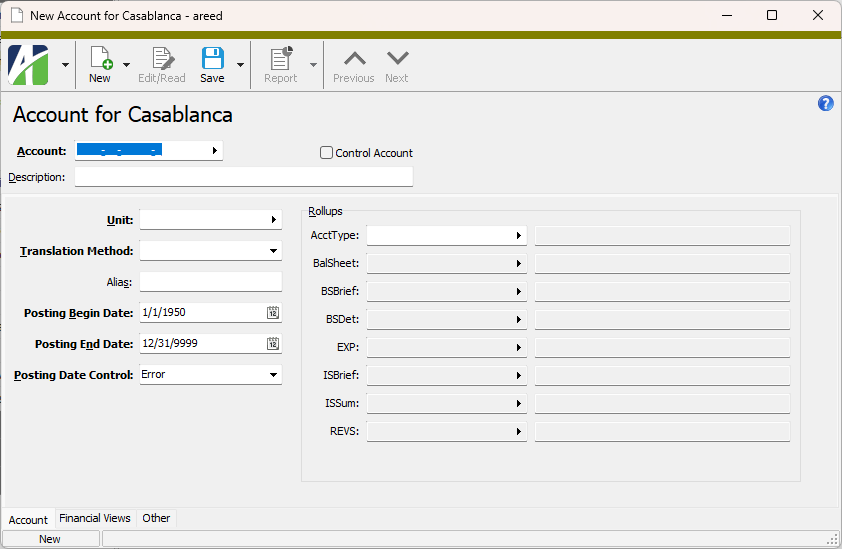
- In the Account field, enter an unused account number or press F2 to open the Account Expand dialog box and build the account number segment by segment. Each division in the account number is a separate segment.
- Enter a Description of the account. The description can be up to 60 characters in length.
- If the account is a subsidiary ledger control account, mark the Control Account checkbox. Marking the checkbox prevents unauthorized users from making manual entries to the control account. For more on control accounts, expand this
 link.
link.
Control accounts
Use control accounts to improve the process of reconciling subsidiary ledger accounts such as "AP Liability" and "AR Receivables" accounts by preventing manual postings to these accounts. With manual postings eliminated, the GL balance should match the subsidiary ledger detail.
Validations to prevent manual entry to a control account are performed during data entry and during proof/merge processes. Any postings made to an account before designating it as a control account are unchanged. Control account validation is performed on the following sources of manual GL entry:
- General Ledger: manual journal entries
- Accounts Payable: invoice extra GL
- Accounts Receivable: invoice extra GL
The GL resource called "Control Accounts" controls use of the Control Account feature. This resource provides three accesses:
- Assign
- A user with this access can view and modify the Control Account checkbox on a GL account.
- A user without this access can view the Control Account checkbox but cannot modify it.
- Entry
- A user with this access can enter a control account in manual entry after overriding a warning message.
- A user without this access cannot enter a control account in manual entry.
- Merge
- A user with this access can merge manual entries that reference a control account; however, a warning message will be presented.
- A user without this access cannot merge manual entries that reference a control account.
- The Unit field defaults to the unit specified on the ledger segment item you selected for this account. If you need to change the unit, select a different unit.
- From the drop-down list, select the Translation Method to use to convert from one currency to another, if applicable. The default translation method is the method specified on the primary segment item. Your options are:
- Current. Also called "simple" translation. Translates all amounts using the rate in effect at the end of the accounting period.
- Historical. Translates all amounts using the rate in effect on the transaction date.
- Average. Translates all amounts using a per period average rate. The average is calculated using this formula:
SUM(rates)/number of rates
- Days Weighted Average. Translates all amounts using a per period weighted average rate. The weighted average is calculated using this formula:
SUM(Rate*Days)/Sum(Days)
- In the Alias field, enter a unique alias for the account. An alias acts as a shortcut for entering the account number.
- In the Posting Begin Date field, enter the date to start posting to this account.
- In the Posting End Date field, enter the date to stop posting to this account.
- From the Posting Date Control drop-down list, select how to handle attempts to post transactions to this account that are outside the defined date range. Your options are:
- Error. Absolutely no postings are permitted to this account outside of the specified date range. ActivityHD will issue an error message and the date will not be accepted.
- Warning. ActivityHD will issue a warning when a date outside the specified date range is entered, but will still allow posting to the date entered.
- Save the new account.
Creating accounts en masse saves time by automatically creating new accounts by generating the legal combinations of segment items from each active segment. Information from segments, segment items, and account rules is applied to create all legal accounts that are not already in the chart of accounts.
Create multiple GL accounts
- In the Navigation pane, highlight the General Ledger > Chart of Accounts folder.
- Click
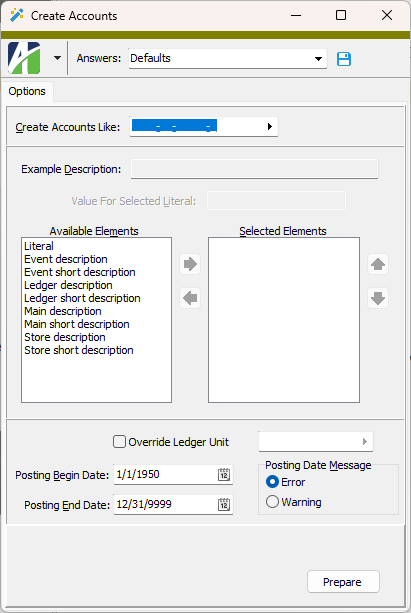
 . The Create Accounts wizard starts.
-
In the Create Accounts Like field, enter an account mask that accurately describes the accounts you want to create. Leave this field blank if you want ActivityHD to use account rules to generate accounts.
Note
If you enter a specific segment item in the mask, that segment item must already exist.
- To build descriptions for the new accounts, select the element(s) to use in the descriptions from the Available Elements list box and click
 to move the element(s) to the Selected Elements list box.
 - In the Selected Elements list box, use
 and
and  to put the elements in the order in which you want them to appear in the description.
 -
If you selected "Literal" as an element of the descriptions, highlight "Literal" in the Selected Elements list box to enable the Value for Selected Literal field above the list box and then type the literal text to use in the description.
Note
As you type, a sample loads in the Example Description field.
- By default, the accounts you create are assigned the unit from the ledger segment. If you want to change this, mark the Override Ledger Unit checkbox and select the unit from the field to the right.
- In the Posting Begin Date field, enter the date to start posting to the new accounts.
- In the Posting End Date field, enter the date to stop posting to the new accounts. To post indefinitely to these accounts, use an end date of 12/31/9999.
- In the Posting Date Message field, select how you want attempts to post to dates outside the specified date range to be handled. Your options are:
- Error. Absolutely no postings are permitted to this account outside of the specified date range. ActivityHD will issue an error message and the date will not be accepted.
- Warning. ActivityHD will issue a warning when a date outside the specified date range is entered, but will still allow posting to the date entered.
- Click Prepare. The accounts that can be created are loaded in the Results tab.
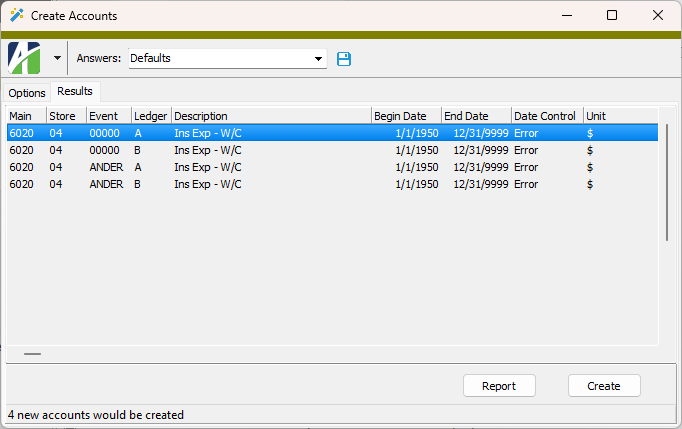
- If you want to generate a report that lists the accounts that would be created, click Report to open the Create Accounts Report dialog box.
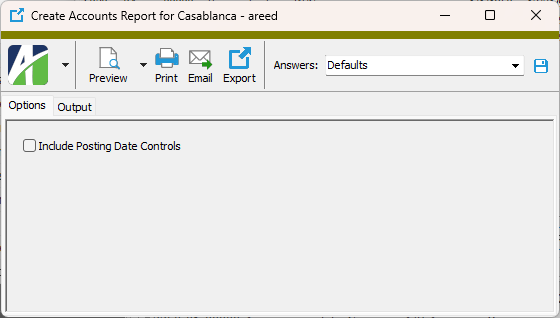
- On the Options tab, mark the Include Posting Date Controls checkbox if you want to include the posting date range and posting message type on the report.
- Select the Output tab.
- In the Design field, look up and select the report design to use.
- In the toolbar, click the icon for the type of output you want:
 - Provides access to two preview options.
- Preview - Click the icon or click the drop-down arrow and select Preview from the drop-down menu to view the report in the Crystal Reports viewer.
- Preview to PDF - Click the drop-down arrow next to the icon and select Preview to PDF to view the report in the PDF reader.
 - Opens the Print dialog so that you can select and configure a printer and then print a paper copy of the report.
 - Opens the Report Email dialog so that you can address and compose an email that the report will be attached to. For best results, ensure your email client is running before you attempt to send a report via email.
 - Opens the Export Report dialog so that you can save the report to a file. File types include Crystal Reports (.rpt), PDF (.pdf), Microsoft Excel (.xls), Microsoft Word (.doc), rich text (.rtf), and XML (.xml).
- To actually generate the accounts, click Create. You are prompted to confirm your action.
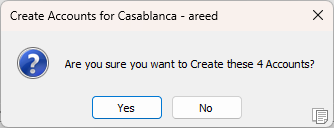
- Click Yes. ActivityHD creates the new accounts.
To close an entity or branch requires that you cease posting to the accounts associated with the entity or branch. For instance, closing Store 1 means you will no longer allow postings to any accounts for Store 1. The transfer of balances such as inventory or assets is handled by entering and merging a journal entry.
To restrict future postings to accounts for an entity or branch, determine the date to end posting (i.e., the date after which to disallow postings to all accounts for the entity or branch). Use the mass change function on the chart of accounts to set the posting end date on all accounts associated with the entity. Also, set the posting control to "Error".
Close an entity or branch
- In the Navigation pane, highlight the General Ledger > Chart of Accounts folder.
-
Right-click the Chart of Accounts folder and select Select and Change. The Change Accounts wizard starts.
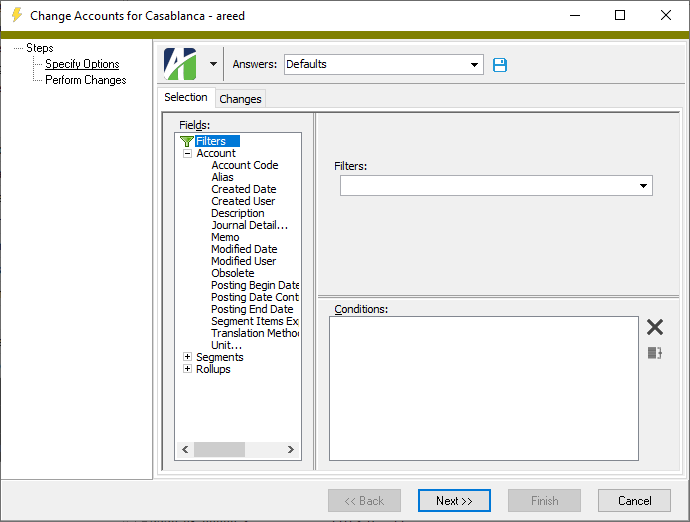
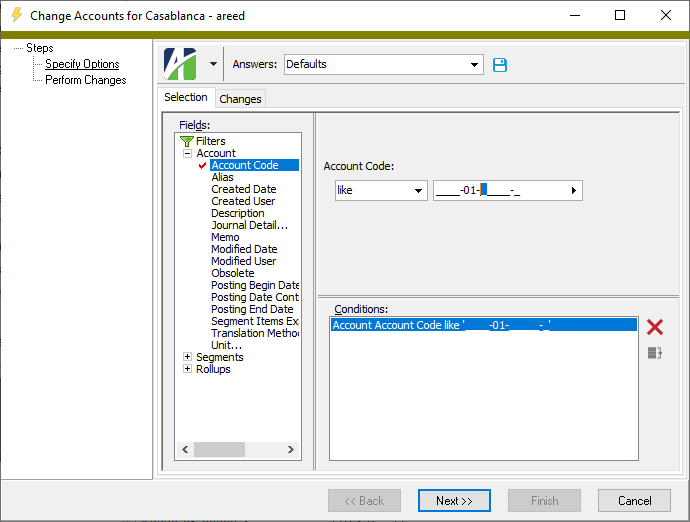
- In the Fields list box, in the Account branch, highlight "Account". An Account field is added to the pane to the right of the list box.
- From the drop-down list, select "like".
-
In the adjacent field, enter the portion of the account code which distinguishes the entity you are closing.
-
Select the Changes tab.
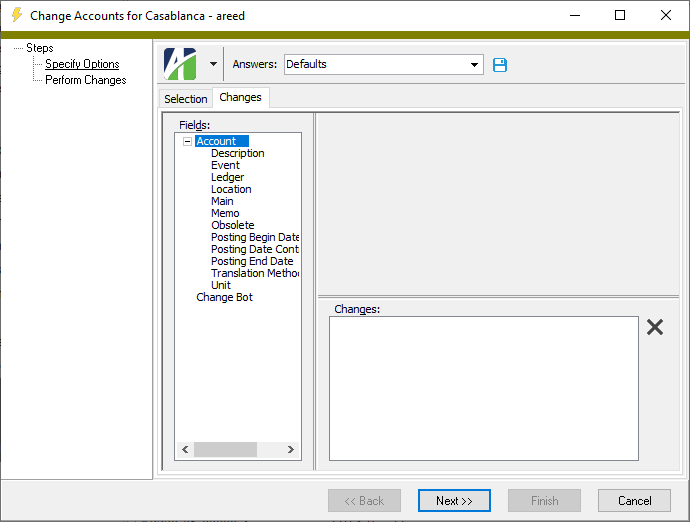
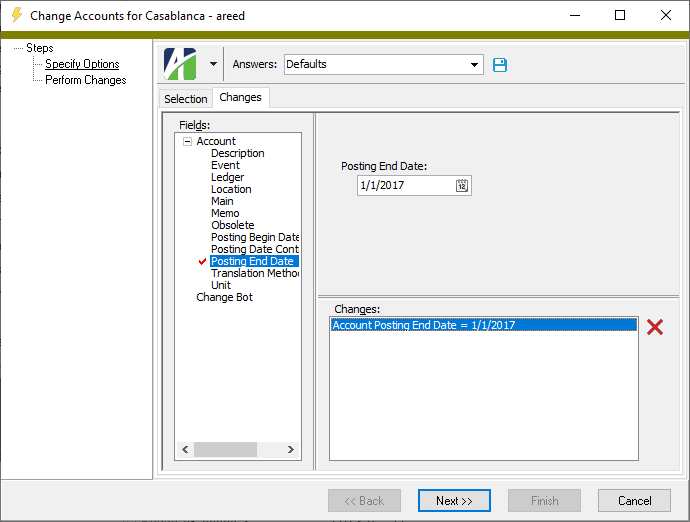
- In the Fields list box in the Account branch, highlight "Posting End Date".
-
In the pane to the right of the list box in the Posting End Date field, enter the date after which to disallow all posting to the selected accounts.
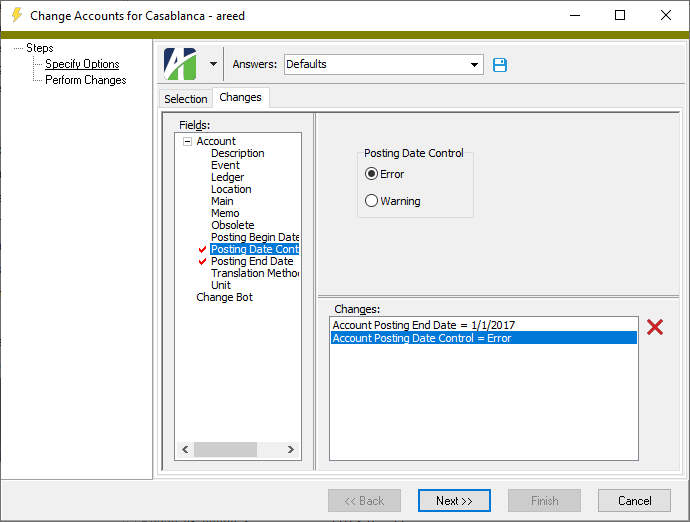
- In the Account branch, highlight "Posting Date Control".
-
In the Posting Date Control field, select "Error".
-
Click Next >>. ActivityHD prompts you to confirm your action.
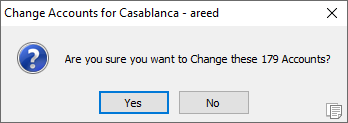
- Click Yes. ActivityHD places the posting end date and posting control setting on all accounts in your selection and advises you when the changes are complete.
- Click Finish.
There are a number of ways to modify account structure:
- mass changing accounts
- changing segment item values
- activation/deactivation of segment
- reordering of segments
- resizing of segment
- renaming of segment
- combining multiple accounts into one account
- splitting one account into multiple accounts
When you change the account structure, most references are also changed including accounts, account rules, rollups, journal entries, and HD views. Some references, however, are not changed including existing financial designs, segment item expressions used in the financial views, filters with condition expressions, and account masks with a partial segment defined (e.g., 100??-01-A).
Important!
Some changes such as changing segment item values, combining accounts, and splitting accounts can affect journal entry history. Be sure to weigh the impact on existing data before you alter the account structure.
![]() Guidelines for working with accounts
Guidelines for working with accounts
Creating accounts
- Both the primary and ledger segments must be active before you can create accounts.
- All active segments must have at least one segment item before you can create accounts.
Deleting accounts
- Accounts cannot be deleted if they have any postings or other references or if they are used on a recurring or allocation journal entry.
Changing account numbers
- An account number cannot be changed if the change would result in a duplicate account number.
- An account number cannot be changed if any of the segments that would be changed are currently rolled up by an active rollup.
Combining accounts
- There are no restrictions on combining one account into another. All attributes of the target account are retained and the source account is deleted.
To combine GL accounts, the target account must be a valid account in the chart of accounts. All activity (such as postings) and references from the source account(s) are moved to the target account. The attributes of the target account are retained and the source account(s) are deleted.
You cannot combine accounts with different units of measure or with different balancing segment items.
For optimal performance, the combine operation is performed on all selected accounts at once; if any errors occur during processing, none of the selected accounts are combined.
To combine two or more GL accounts:
Combine GL accounts
- In the Navigation pane, highlight the General Ledger > Chart of Accounts folder.
- Start the Combine wizard using one of the following methods:
- To use filters to select the source account(s) to combine:
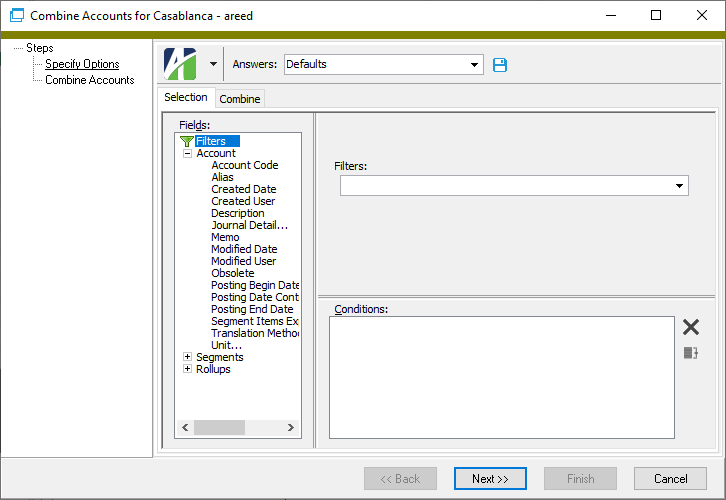
- Right-click the Chart of Accounts folder and select Select and Combine from the shortcut menu.
- On the Selection tab, define any filters to apply to the data.
- To hand-select the source account(s) to combine:
- In the HD view, select the source account(s) to combine. You can use Ctrl and/or Shift to select multiple accounts.
- Click
 .
. - On the Combine tab in the Combine Into field, select the target account.
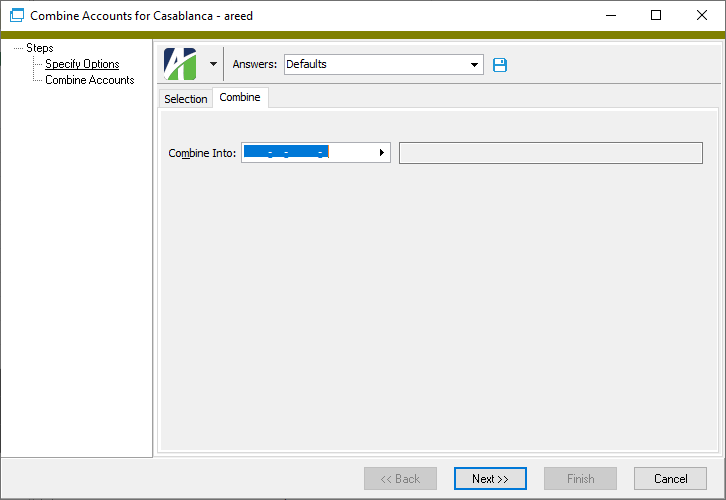
- Click Next >>. ActivityHD prompts you to confirm that you want to combine the selected accounts.
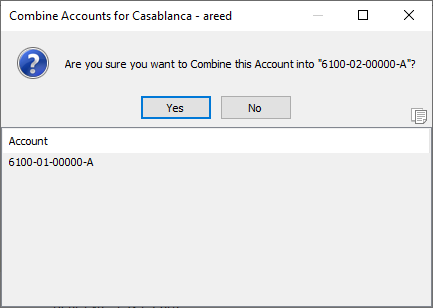
- Click OK.

- When the process is complete, click Finish.
The following automation method handles combining multiple accounts:
GLPackage.CombineAccounts(FromAccounts, ToAccount)
Chart of Accounts Listing
Purpose
Content
For each account included on the report, the listing shows:
- description
- unit
- alias
- an indication if an account is a control account.
In addition, you can include one or more of the following:
- posting date controls (posting date range, posting date control)
- timestamps
- memos
- custom fields.
The following total appears on the report:
- record count.
Print the report
- In the Navigation pane, highlight the General Ledger > Chart of Accounts folder.
- Start the report set-up wizard.
- To report on all or a filtered subset of accounts:
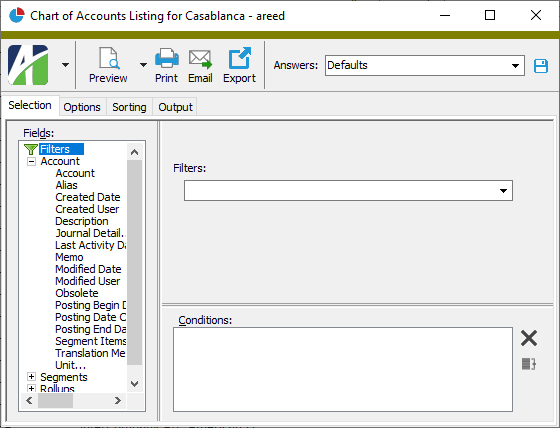
- Right-click the Chart of Accounts folder and select Select and Report > Chart of Accounts Listing from the shortcut menu.
- On the Selection tab, define any filters to apply to the data.
- To report on specifically selected accounts:
- In the HD view, select the accounts to include on the report. You can use Ctrl and/or Shift selection to select multiple records.
- Click
 and select Chart of Accounts Listing from the drop-down menu.
- To report on a particular account from the Account window:
- In the HD view, locate and double-click the account to report on. The Account window opens with the account loaded.
- Click
 and select Chart of Accounts Listing from the drop-down menu.
- To report on all or a filtered subset of accounts:
- Select the Options tab.
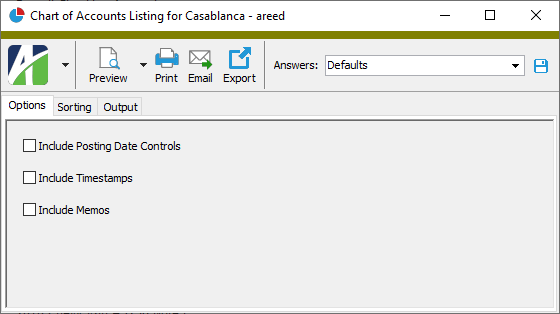
- Mark the checkbox(es) for the additional information to include:
- Posting Date Controls
- Report Options. To include a section at the end of the report with the report settings used to produce the report, leave the checkbox marked. To produce the report without this information, clear the checkbox.
- Timestamps
- Memos
- Custom Fields (only visible if custom fields are set up)
- Select the Sorting tab.
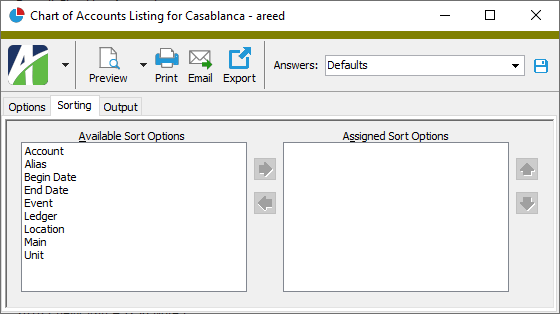
- In the Available Sort Options list box, highlight the option(s) to sort the report by, then click
 to move your selection(s) to the Assigned Sort Options list box.
 - If you selected multiple sort options, use
 and
and  to arrange the sort options in the order you want them applied.
 - Select the Output tab.
- In the Design field, look up and select the report design to use.
- In the toolbar, click the icon for the type of output you want:
 - Provides access to two preview options.
- Preview - Click the icon or click the drop-down arrow and select Preview from the drop-down menu to view the report in the Crystal Reports viewer.
- Preview to PDF - Click the drop-down arrow next to the icon and select Preview to PDF to view the report in the PDF reader.
 - Opens the Print dialog so that you can select and configure a printer and then print a paper copy of the report.
 - Opens the Report Email dialog so that you can address and compose an email that the report will be attached to. For best results, ensure your email client is running before you attempt to send a report via email.
 - Opens the Export Report dialog so that you can save the report to a file. File types include Crystal Reports (.rpt), PDF (.pdf), Microsoft Excel (.xls), Microsoft Word (.doc), rich text (.rtf), and XML (.xml).
Data extensions
The following data extension is available for the report:
- Accounts
You can now group and subtotal the General Ledger Detail Report by GL attributes—even rollup attributes.
General Ledger Detail Report
Purpose
The General Ledger Detail Report shows GL detail records by GL account.
Content
For each account included on the report, the report shows:
- description
- net amount
- total debits
- total credits
- account balance.
In addition, you can include one or more of the following:
- unmerged entries not on hold
- closing entries from the current year
- period totals (date range, period net amount, period total debits, period total credits, period account balance)
- detail debits and credits (transaction date, posting description, reference, source, merge number, debit or credit amount).
If you include detail debits and credits, you can also include one or more of the following:
- entry information (entry number, entry date, user who created entry, line number, merge date, user who performed merge, indication of voided and reversal entries with batch and entry number)
- detail attributes
- detail memos
- subsidiary detail (date, posting description, amount).
The following totals appear on the report:
- grand totals
- trial balances
- item grand totals
- item trial balances.
Preinstalled saved answers
For your convenience, ActivityHD includes a preinstalled saved answer for a common reporting scenario:
- "GL Detail Spreadsheet"
Print the report
- In the Navigation pane, highlight the General Ledger > Chart of Accounts folder.
- Start the report set-up wizard.
- To report on all or a filtered subset of accounts:
- Right-click the Chart of Accounts folder and select Select and Report > General Ledger Detail Report from the shortcut menu.
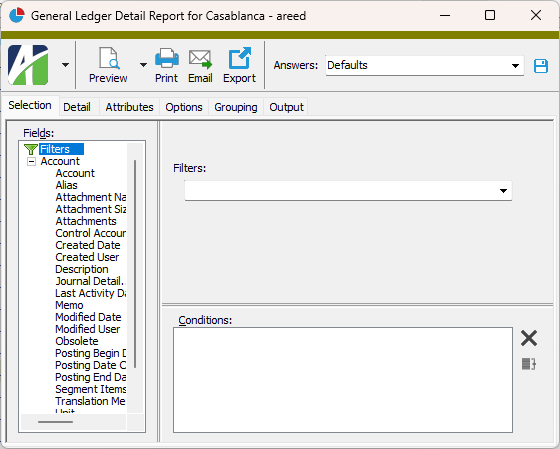
- On the Selection tab, define any filters to apply to the data.
- To report on specifically selected accounts:
- In the HD view, select the accounts to include on the report. You can use Ctrl and/or Shift selection to select multiple records.
- Click
 and select General Ledger Detail Report from the drop-down menu.
- To report on a particular account from the Account window:
- In the HD view, locate and double-click the account to report on. The Account window opens with the account loaded.
- Click
 and select General Ledger Detail Report from the drop-down menu.
- To report on all or a filtered subset of accounts:
- Select the Detail tab.
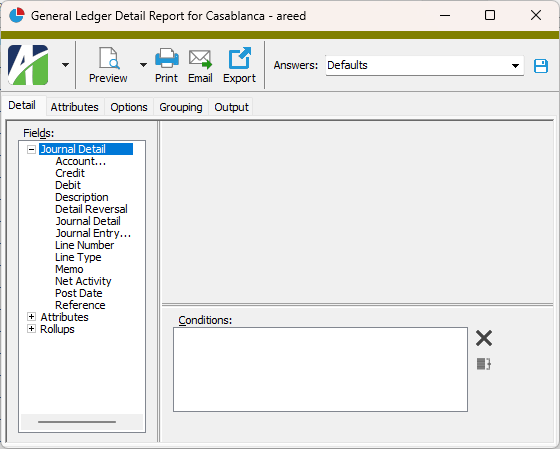
- Define any filters you want to apply to the journal detail records.
- Select the Attributes tab.
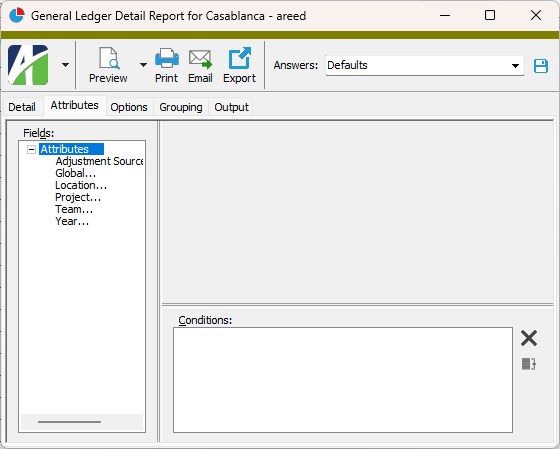
- Define any filters you want to apply to attributes.
- Select the Options tab.
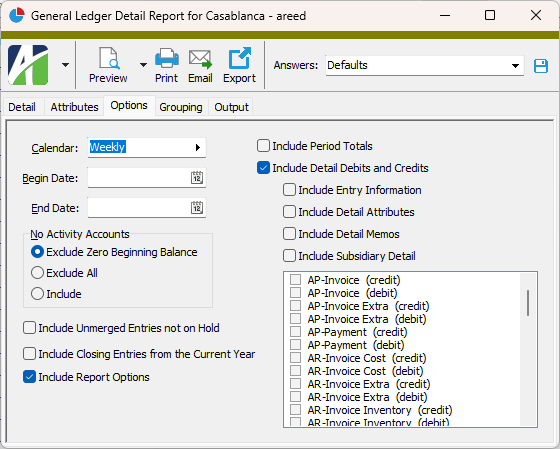
- In the Calendar field, select the calendar for which to run the report.
- In the Begin Date and End Date fields, enter the range of dates for which to include detail on the report.
- In the No Activity Accounts field, select the option that describes how you want the report to handle accounts with no activity. Your options are:
- Exclude Zero Beginning Balance. Exclude accounts with no activity in the specified date range only if the balance on the beginning date was zero.
- Exclude All. Exclude all accounts with no activity in the specified date range.
- Include. Include all accounts in your selection regardless of posting activity.
- Mark the checkbox(es) for the additional information to include:
- Unmerged Entries Not on Hold
- Closing Entries from the Current Year
- Report Options. To include a section at the end of the report with the report settings used to produce the report, leave the checkbox marked. To produce the report without this information, clear the checkbox.
- Period Totals
- Detail Debits and Credits. If you mark this checkbox, you can mark one or more of the following checkboxes as well:
- Entry Information
- Detail Attributes
- Detail Memos
- Subsidiary Detail. Mark this checkbox to include all subsidiary detail. To select the type of subsidiary detail to include, leave this checkbox cleared and mark the checkbox(es) for the type(s) to include in the list box below.
- Select the Grouping tab.
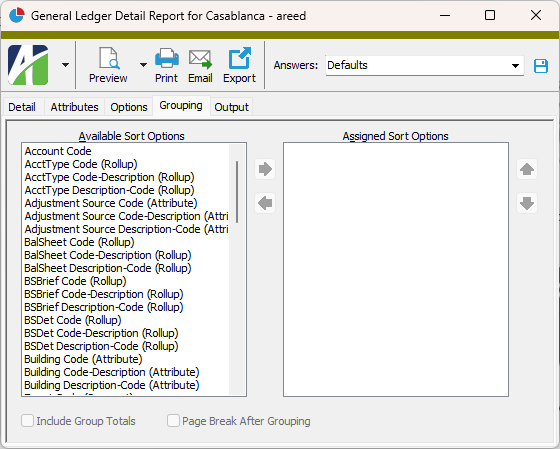
- In the Available Sort Options list box, highlight the segment(s), rollup(s), and/or attribute(s) to group the report by, then click
 to move your selection(s) to the Assigned Sort Options list box. If you do not specify a group, the report is sorted by account.
 - If you selected multiple groupings, use
 and
and  to arrange the groups in the order you want them applied.
 - If you select at least one segment, rollup, or attribute, the Include Group Totals checkbox below the list boxes is enabled and marked. The report will show group totals for each unique grouping. If you do not want the report to show group totals, clear the checkbox.
- If the Include Group Totals checkbox is marked, the Page Break After Grouping checkbox is enabled. Mark this checkbox if you want to start a new report page after each group total.
- Select the Output tab.
- In the Design field, look up and select the report design to use.
There are three built-in report designs for the General Ledger Detail Report:
- GL Detail Landscape
- GL Detail Portrait (formerly, General Ledger Detail Report)
- GL Detail Spreadsheet - This design provides strict column formatting. This is beneficial if you need to export GL detail to an Excel spreadsheet. This design also lays out subsidiary detail in the same columns as the GL detail design, so that credits and debits align.
- In the toolbar, click the icon for the type of output you want:
 - Provides access to two preview options.
- Preview - Click the icon or click the drop-down arrow and select Preview from the drop-down menu to view the report in the Crystal Reports viewer.
- Preview to PDF - Click the drop-down arrow next to the icon and select Preview to PDF to view the report in the PDF reader.
 - Opens the Print dialog so that you can select and configure a printer and then print a paper copy of the report.
 - Opens the Report Email dialog so that you can address and compose an email that the report will be attached to. For best results, ensure your email client is running before you attempt to send a report via email.
 - Opens the Export Report dialog so that you can save the report to a file. File types include Crystal Reports (.rpt), PDF (.pdf), Microsoft Excel (.xls), Microsoft Word (.doc), rich text (.rtf), and XML (.xml).
Tip
Although the natural behavior of the report is to sort by account code, with the advent of attributes, it can be useful to explicitly include "Account Code" in the sort options followed by at least one attribute. This allows you to break information down by attribute item within accounts.
Data extensions
The following data extensions are available for the report:
- Journal detail
- GL detail source
You can now group and subtotal the Trial Balance Report by GL attributes—even rollup attributes.
Trial Balance Report
Purpose
The Trial Balance Report shows account activity and beginning and ending balances for the accounting period you specify and helps you analyze out-of-balance issues.
Content
For each account included on the report, the report shows:
- account number and description
- beginning balance for the period specified
- total debit transactions during the period
- total credit transactions during the period
- net activity for the period
- ending balance for the period.
In addition, you can include one or more of the following:
- detail for drilldown
- unmerged detail not on hold
- report dialog answers.
If you include drilldown detail, you can also include:
- entry information (batch name, entry number, sequence number)
- detail attributes.
The following totals appear on the report:
- subtotals as specified
- grand totals.
Print the report
- In the Navigation pane, highlight the General Ledger > Chart of Accounts folder.
- Start the report set-up wizard.
- To report on all or a filtered subset of accounts:
- Right-click the Chart of Accounts folder and select Select and Report > Trial Balance Report from the shortcut menu.
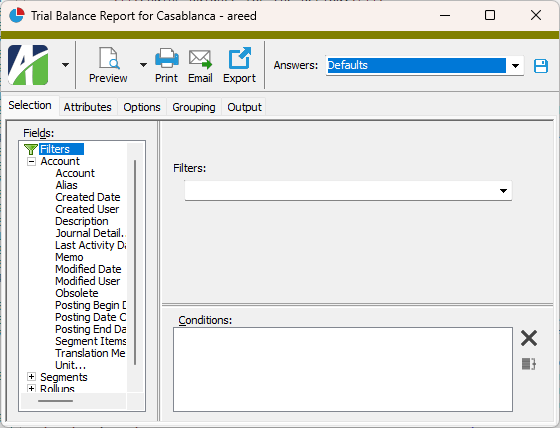
- On the Selection tab, define any filters to apply to the data.
- To report on specifically selected accounts:
- In the HD view, select the accounts to include on the report. You can use Ctrl and/or Shift selection to select multiple records.
- Click
 and select Trial Balance Report from the drop-down menu.
- To report on a particular account from the Account window:
- In the HD view, locate and double-click the account to report on. The Account window opens with the account loaded.
- Click
 and select Trial Balance Report from the drop-down menu.
- To report on all or a filtered subset of accounts:
- Select the Attributes tab.
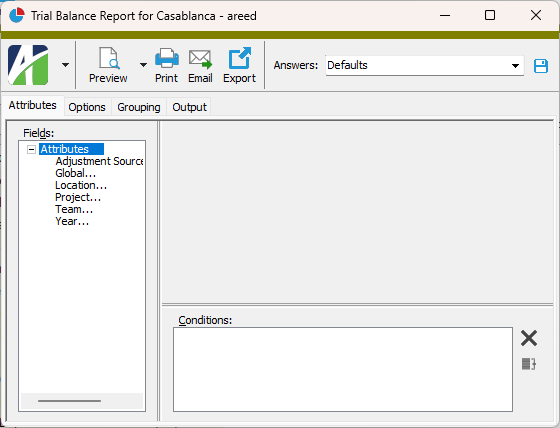
- Define any filters you want to apply to attributes.
- Select the Options tab.
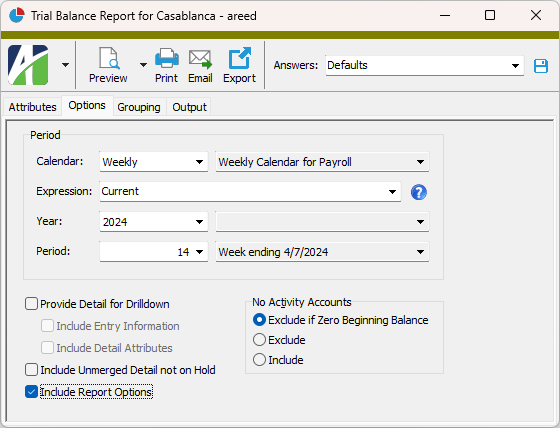
- From the Calendar drop-down list, select the calendar to base the report on. If the selected calendar contains today's date, the Year and Period fields default to the calendar period which contains today's date. Otherwise, if the calendar does not contain today's date, the fields default to the last valid period before the current date.
-
To define the reporting period using a relative expression, select or enter the period expression in the Expression field. If you prefer to explicitly enter the year and period, skip to step 8.
You can select from the following common period expressions:
- Current
- Current - 1 period
- Current - 1 year
Alternatively, you can type a valid period expression in the field. For help on period expression syntax, click the help button to the right of the field.
If you select or enter a period expression, ActivityHD adjusts the values in the Year and Period fields accordingly.
If you enter a period expression, skip to step 10.
- From the Year drop-down list, select the year of the period to report on.
- From the Period drop-down list, select the period to report on.
- Mark the checkbox(es) for the additional information to include:
- Provide Detail for Drilldown. Mark this checkbox to include transaction detail when you drill down on an account record on the report. If you mark this checkbox, the Entry Information and Detail Attributes checkboxes are enabled.
- Entry Information. Mark this checkbox to include batch name, entry number, and sequence number for each transaction listed in the detail drilldown.
- Detail Attributes. Mark this checkbox to include GL attributes for journal detail postings.
- Unmerged Detail Not on Hold
- Report Options. To include a section at the end of the report with the report settings used to produce the report, leave the checkbox marked. To produce the report without this information, clear the checkbox.
- Provide Detail for Drilldown. Mark this checkbox to include transaction detail when you drill down on an account record on the report. If you mark this checkbox, the Entry Information and Detail Attributes checkboxes are enabled.
- In the No Activity Accounts field, select the option that describes how you want the report to handle accounts with no activity. Your options are:
- Exclude if Zero Beginning Balance. Exclude accounts with no activity in the specified period only if the balance at the beginning of the period was zero.
- Exclude. Exclude all accounts with no activity in the specified period.
- Include. Include all accounts in your selection regardless of posting activity.
- Select the Grouping tab.
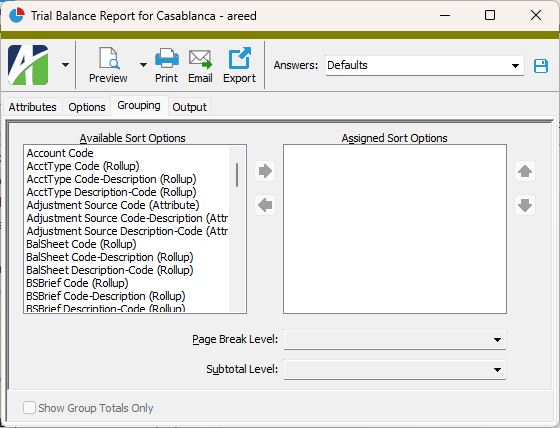
- In the Available Sort Options list box, highlight the segment(s), rollup(s), and/or attribute(s) to sort the report by, then click
 to move your selection(s) to the Assigned Sort Options list box.
 - If you selected multiple groupings, use
 and
and  to arrange the groups in the order you want them applied.
 - If you want the report to start a new page for each change in one of the sorting options you specified, select the sorting option to break on from the Page Break Level drop-down list. If you do not want to insert page breaks, accept "(none)".
- If you want the report to subtotal based on one of the sorting options you specified, select the sorting option to subtotal on from the Subtotal Level drop-down list. If you do not want to show subtotals, accept "(none)".
- If at least one sort option is assigned, the Show Group Totals Only checkbox is enabled. Mark this checkbox if you want the report to show group totals without the account-level information behind the totals.
- Select the Output tab.
- In the Design field, look up and select the report design to use.
- In the toolbar, click the icon for the type of output you want:
 - Provides access to two preview options.
- Preview - Click the icon or click the drop-down arrow and select Preview from the drop-down menu to view the report in the Crystal Reports viewer.
- Preview to PDF - Click the drop-down arrow next to the icon and select Preview to PDF to view the report in the PDF reader.
 - Opens the Print dialog so that you can select and configure a printer and then print a paper copy of the report.
 - Opens the Report Email dialog so that you can address and compose an email that the report will be attached to. For best results, ensure your email client is running before you attempt to send a report via email.
 - Opens the Export Report dialog so that you can save the report to a file. File types include Crystal Reports (.rpt), PDF (.pdf), Microsoft Excel (.xls), Microsoft Word (.doc), rich text (.rtf), and XML (.xml).
Data extensions
The following data extension is available for the report:
- Accounts
Account Record ID
The account number for the General Ledger account. The account number is comprised of predefined segments.
Press F2 to open the Account Expand dialog box where you can look up an account number, find an account number by its alias, build the account number by segment, or view setup and setup sources.
Press F3 to look up the account.
If an account is already selected, you can press F4 to open the record in the Account window.
Account tab
The unit associated with the account. The default unit is the unit on the account's ledger segment item. All postings to the GL account are recorded in this unit.
Press F3 to look up the value.
If a value is already selected, you can press F4 to open the record in its native editor.
- Current. Also called "simple" translation. Translates all amounts using the rate in effect at the end of the accounting period.
- Historical. Translates all amounts using the rate in effect on the transaction date.
- Average. Translates all amounts using a per period average rate. The average is calculated using this formula:
SUM(rates)/number of rates
- Days Weighted Average. Translates all amounts using a per period weighted average rate. The weighted average is calculated using this formula:
SUM(Rate*Days)/Sum(Days)
The earliest date that posting is allowed to the account.
Note
If the posting date control on the account is set to "Error", you cannot post to the account before this date. If the control is set to "Warning", you can post to the account before this date.
The last date that posting is allowed to the account.
Note
If the posting date control on the account is set to "Error", you cannot post to the account after this date. If the control is set to "Warning", you can post to the account after this date.
- Error. Select this option to prevent posting outside the date range. If a user attempts to post outside the range, ActivityHD returns an error and will not accept the date.
- Warning. Select this option to ensure that posting outside the date range is deliberate. If a user attempts to post outside the range, ActivityHD returns a warning, but still accepts the date.
The rollup item the account is assigned to and the rollup item's description.
Press F3 to look up the value.
If a value is already selected, you can press F4 to open the record in its native editor.
Custom tab
This tab is visible if custom fields exist for the entity. At a minimum, if there are custom fields, a Fields subtab will be present. One or more additional categories of subtabs may also be visible.
Fields subtab
This tab prompts for values for any custom fields set up for entity records of this entity type. Respond to the prompts as appropriate.
References subtab
This tab is visible if other records reference the current record.
Example
Suppose a custom field exists on PRCodes that references an ARCode. On the ARCode record, on the Custom > References subtab, you can view all the PRCodes which reference that ARCode.
Exchange Folder subtab
This tab is visible only if you set up a custom field with a data type of "Exchange Folder". The label on this tab is the name assigned to the custom field.
This tab shows the contents of the specified Exchange folder.
File subtab
This tab is visible only if you set up a custom field with a data type of "File". The label on the tab is the name assigned to the custom field.
This tab renders the contents of the specified file according to its file type.
Internet Address subtab
This tab is visible only if you set up a custom field with a data type of "Internet Address". The label on this tab is the name assigned to the custom field.
This tab shows the contents of the specified web page.
Network Folder subtab
This tab is visible only if you set up a custom field with a data type of "Network Folder". The label on this tab is the name assigned to the custom field.
This tab shows the contents of the specified network folder.
Journal Detail tab
The Journal Detail pane shows the Journal Detail HD view filtered to show all journal detail lines for the selected account.
Double-click a row in the pane to drill down to its record in the Journal Detail window.
Financial Views tab
One tab appears in this area for each active account-level financial view. Select the tab for the financial view you want to view totals for.
Depending on how the columns in a financial view are defined, you can view account totals such as period beginning balance, period activity, period ending balance, year-to-date activity, activity for the month, activity for the quarter, etc. Use the filters above the tabs to select the period to view totals for and to include or exclude unmerged entries.
Double-click a row in the pane to drill down to its record in the Financial View Item window, then highlight a total to view the journal detail entries which comprise the total.
Attachments tab
The Attachments tab is visible if any record for a given entity has an attachment. If the Attachments tab is not visible, this implies that no record of the entity type has an attachment on it; however, once an attachment is added to any record of the entity type, the Attachments tab will become available.
Change Logs tab
This tab is visible if the user has "Change Logs" access to the associated data folder resource.
The Change Logs pane shows the Change Logs HD view filtered to show all change logs for the selected entity record.
Double-click a row in the pane to drill down to its record in the Change Log window.
Other tab
Developer tab
This tab is visible only when developer features are enabled.
Automation subtab
This subtab shows field names and values for the current data record. Use the information in the subtab to assist when creating automation objects such as bots and import files. The field names and field values can be copied from the text box and pasted directly into your code or application. To copy content from the text box, highlight the content to copy and press Ctrl+C or right-click your selection and select Copy from the context menu.
Export (XML) subtab
This subtab shows the XML syntax for exporting the selected data record. The syntax can be copied from the text box as an exemplar for creating your own automation objects for bots, import files, ActivWebAPI, etc. To copy content from the text box, highlight the content to copy and press Ctrl+C or right-click your selection and select Copy from the context menu.
Import (XML) subtab
This subtab allows you to select a file for import and shows the XML syntax for importing data records. Use the subtab to explore the XML syntax for importing data records. In particular, you can investigate the syntax which results when using Data.Import and ActivWebAPI data POST and DELETE routes.
Change Log (XML) subtab
This subtab is visible only when the Enable Change Logs option is marked in System Options or Company Options (depending on whether the feature applies at the system or the company level). This is the default setting when developer features are enabled.
This subtab allows you to investigate changes to the current data record. The syntax can be copied for use in bots, dashboards, ActivWebAPI, and other automation. To copy content from the text box, highlight the content to copy and press Ctrl+C or right-click your selection and select Copy from the context menu.
Select Statement (SQL) subtab
This subtab allows you to investigate the SQL select statement used to retrieve the current data record. The syntax can be copied as an exemplar for data sources and other automation. To copy content from the text box, highlight the content to copy and press Ctrl+C or right-click your selection and select Copy from the context menu.

|
Extras\General Ledger\Import Accounts.xls; Change Accounts.xls; Combine Accounts.xls; Export Accounts using IReport.xls |
Chart of accounts security
Common accesses available on chart of accounts
| Access | A user with this access can... |
|---|---|
| Change | Use the mass change action on chart of accounts. |
| Change Logs | |
| Custom Fields | Create and edit custom fields for chart of accounts. |
| Data | Have read-only access to chart of accounts from anywhere in the software (e.g., field validations, filters, date expressions). |
| Delete | Delete chart of accounts. |
| Edit | Edit chart of accounts records. |
| Export | Export chart of accounts records from ActivityHD. |
| Import | Import chart of accounts records into ActivityHD. |
| New | Create new chart of accounts records. |
| Read | Have read-only access to chart of accounts records. |
| Report | Run reports with chart of accounts information. |
| Report Designs | Create and edit report designs with chart of accounts information. This access enables the Report Designs button on the Output tab of report dialogs. |
| Shared Answers | Create and edit saved answers related to chart of accounts. |
| Shared Filters | Create and edit shared filters on chart of accounts. |
| Visible | View the Chart of Accounts folder in the Navigation pane. |
Special accesses available on chart of accounts
| Access | A user with this access can... |
|---|---|
| Combine | Combine accounts. |
| Create | Create new accounts. |
Chart of accounts filters
The following built-in filters are available for the chart of accounts:
| Filter Name | Effect |
|---|---|
| ? Description | Prompts for an account description and lists the accounts with a description that contains the specified search string. |
| Closed Accounts | Lists accounts that are closed. |
| Missing AcctType [dynamic] | This filter is automatically created when the AcctType rollup is activated. Lists the accounts which have not been assigned an AcctType value. Use this filter to help ensure rollup health. |
| Missing <Rollup> [dynamic] | If the AcctType rollup is active, this filter is automatically created for each active rollup with a financial type value. Lists accounts that are missing a rollup assignment based on the financial type of the rollup and the AcctType value on the account. Use this filter to help ensure rollup health. |
| Open Accounts | Lists accounts that are open. |
| Posted Accounts | Lists accounts with journal detail entries. |
| Unposted Accounts | Lists accounts with no journal detail entries. |
Account Financial Report security
Common accesses available on the Account Financial Report
| Access | A user with this access can... |
|---|---|
| Run Report | Run the Account Financial Report. |
General Ledger Detail Report security
Common accesses available on the General Ledger Detail Report
| Access | A user with this access can... |
|---|---|
| Report Designs | Create and edit report designs for the General Ledger Detail Report. This access enables the Report Designs button on the Output tab of the report dialog. |
| Run Report | Run the General Ledger Detail Report. |
Trial Balance Report security
Common accesses available on the Trial Balance Report
| Access | A user with this access can... |
|---|---|
| Report Designs | Create and edit report designs for the Trial Balance Report. This access enables the Report Designs button on the Output tab of the report dialog. |
| Run Report | Run the Trial Balance Report. |
Calendar Period
A period expression which defines a relative reporting period for the financial view. You can select a period expression from the drop-down list or enter a period expression directly in the field. To explicitly specify a reporting period for the selected calendar, use the Year and Period fields instead.
The dropdown contains the following common period expressions:
- Current
- Current - 1 period
- Current - 1 year
For help with proper period expression syntax, click the help button to the right of the field.
Report Email dialog
- Windows user default account. Sends email using the user's Windows default email account. For most users, this is the account configured in Outlook or another email client application.
- Server personal. Sends email using the email configuration for the system or company server and the email address on the current user's authorized user record. The authorized user record must have a confirmed email address.
- Server generic. Sends email using the email configuration and "from" address for the system or company server. This option requires "Send generic" access to the Server Email resource.
|
5225 S Loop 289, #207 Lubbock, TX 79424 806.687.8500 | 800.354.7152 |
© 2025 AccountingWare, LLC All rights reserved. |